
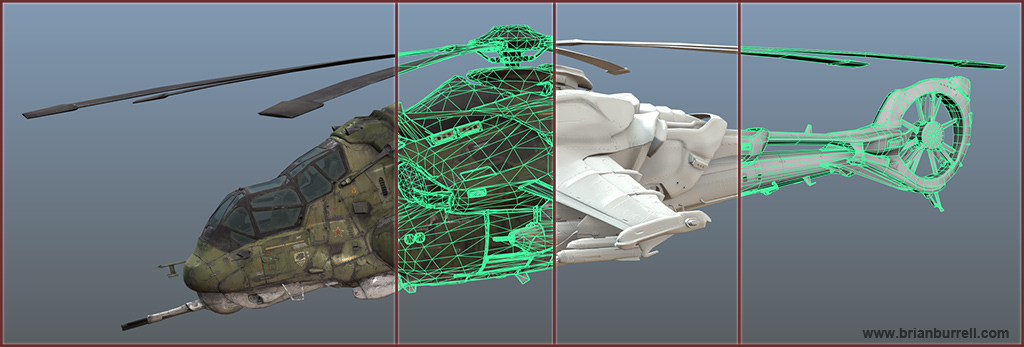
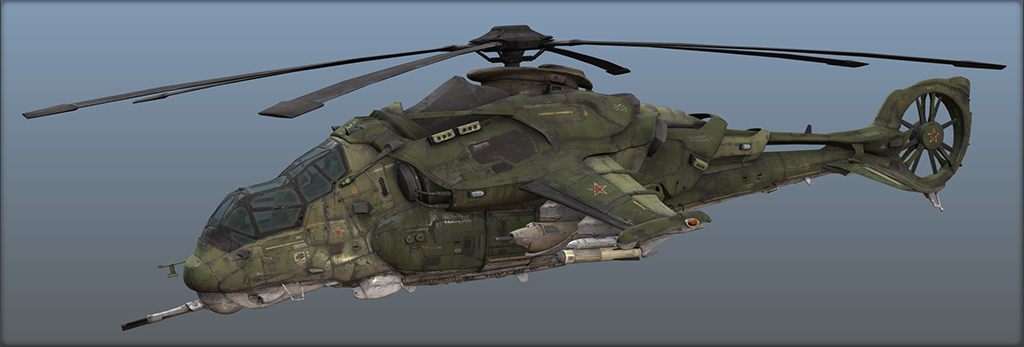
Futuristic Russian Attack Helicopter (Mi-27R)
Summary: This page provides further information on the development of the PS4/Xbox One spec futuristic Hind helicopter from my personal 3d section HERE. The main categories are: base mesh creation, hiPoly vector displacement sculpting in mudbox, texture painting in mudbox, and poly reduction techniques in Maya LT.
DISCLOSURE: Some of the techniques I show in this tutorial (especially the sculpting section) are probably not optimum for general real-time game development due to the time constraints. I chose some of these techniques for both experimentation and for quality goals regardless of deadlines. Please keep that in mind, especially younger artists wanting to break into the industry.
Software used: Maya 2010+, Maya LT, Mudbox 2011+, Photoshop CS5+
Polycount: roughly 35k triangles and that includes all weapons and moving parts. A 2nd version was built for Unity at slightly under 25k triangles.
Textures: 2048x2048 set, 512x512 set , 2x 256x256 (glass) --> "Set" = diffuse, color spec, gloss, tangent normalmap
The hi-res renders are using double the above texture sizes.
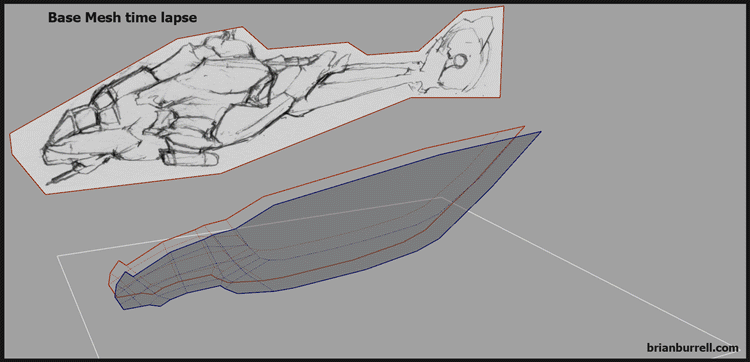
Conceptual and Base Mesh modeling phase:
There was quite a bit of 3d iteration on the main design and silhouette of the heli after the initial concepts were drawn. The belly was much fatter at one point and the shell area around the middle tail section had more fin-like attachments. These gave the vehicle a stronger sci-fi aesthetic than I was comfortable with so they were eventually toned down.
I constantly referenced several photos of various Hind helicopters in addition to other modern helicopters that interested me while working on the design. I took lots of liberties but tried to stay grounded in reality as best I could.
Within Maya, I relied on several custom mel functions to make it easier to model in a mirrored fashion using lots of pieces without the fear of node/grouping clutter or double selecting geo. This can be partially seen in the animated gifs below as well as some of the iteration process.
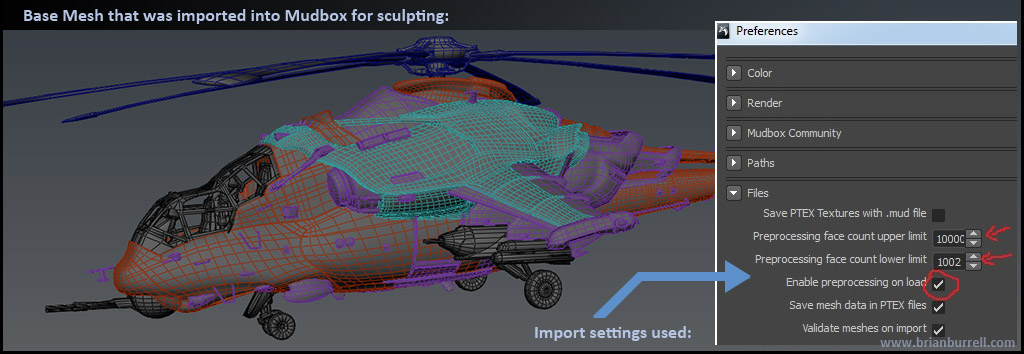
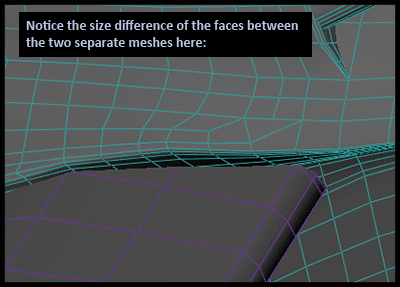
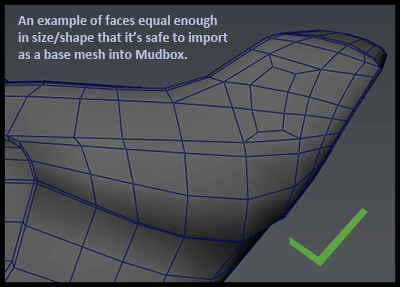
Base Mesh tips when dealing with Mudbox:
Since Mudbox lacked a dynamesh style feature that has proven extremely popular in Zbrush, I had to be very careful with my poly distribution when creating the base meshes in Maya. Because I ultimately planned on using lots of vector displacement maps and sculpting tons of fine level detail, it was critical that the base meshes were as optimal as possible to minimize insane polycounts after subdividing. It should also be noted that I strived to maintain mostly quads for all of the meshes.
For the final mudbox scenes I ended up with 3 core files for the core body (avg of 30 million total polys each scene) and a few extra files for miscellaneous sections like cockpit, landing gear, blades, etc.
General tips to keep in mind:
Additional base mesh notes:
Mudbox supports creased edges in later versions and I did experiment a little with this feature for the helicopter. It can be quite useful since it keeps you from having to add lots of support loops for your hard surface meshes in order to control the edge tightness. The downside is that you have to now manage this extra feature set in your modeling package and you also don't get the same quality for certain edges compared to traditional support loops. For keeping your mudbox subdivided mesh polycounts down, it's certainly worth considering though, even with its drawbacks.
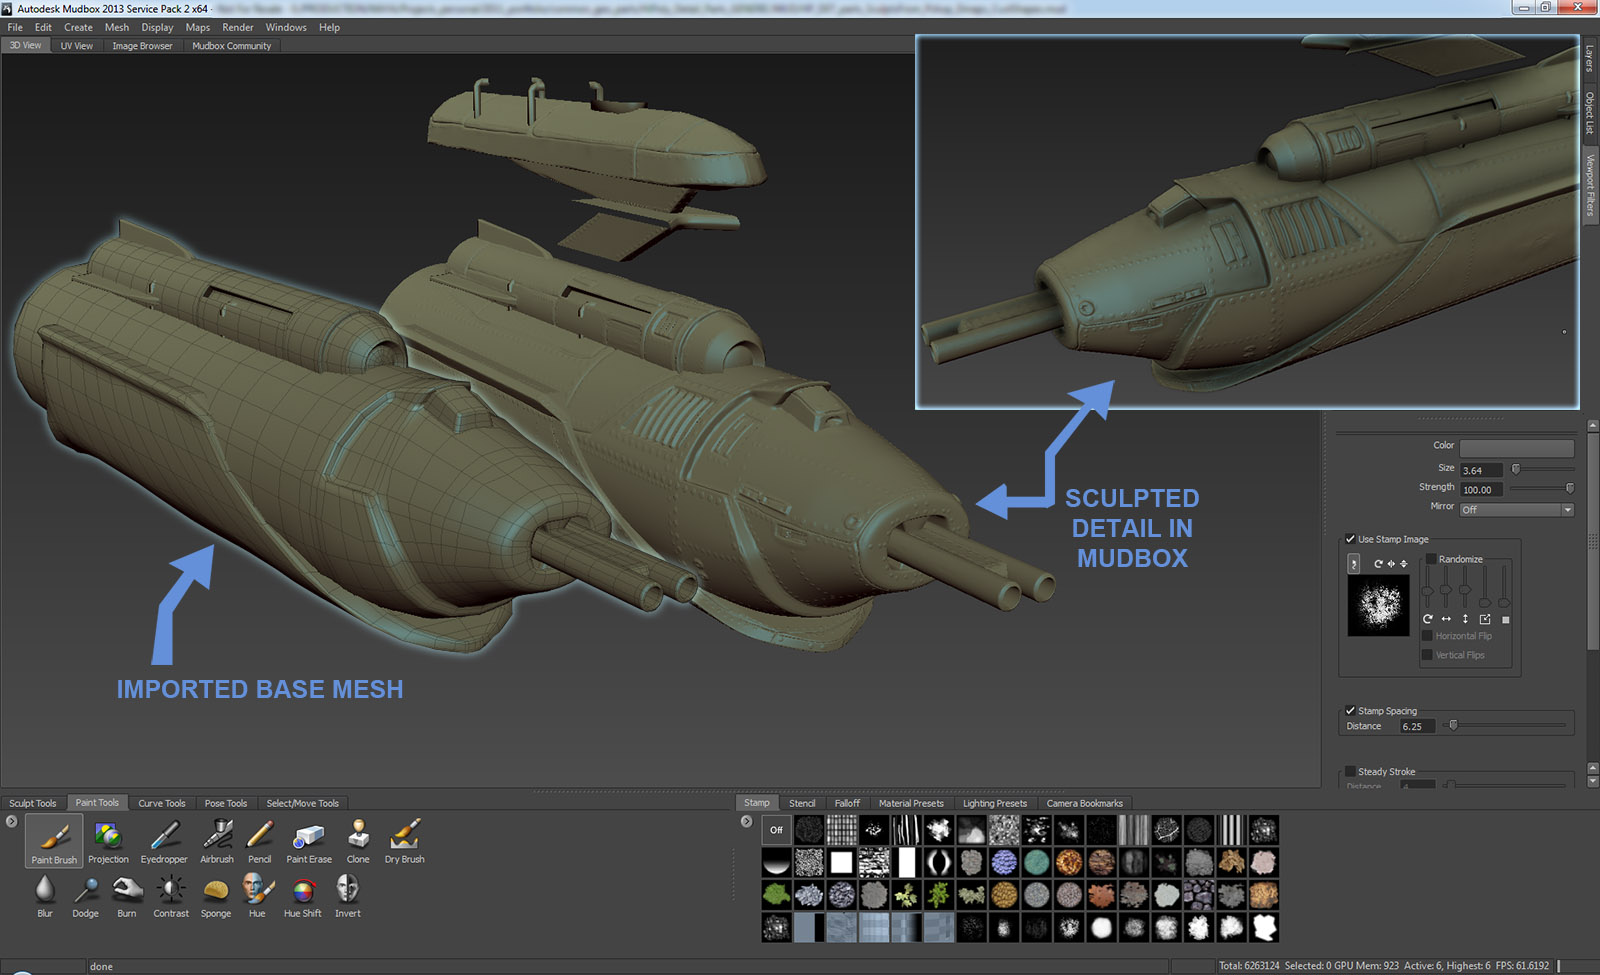
HiPoly Details - Using Vector Displacement Maps in Mudbox:
After finishing my base mesh of the helicopter in Maya, I spent several days creating what I call "detail planes" in Mudbox. These detail planes originated from cleaned up photographs of various vehicle parts that I quickly turned into displacement maps. I would then go in with sculpting tools and polish them to my satisfaction. For the final stages, I would bake them out as vector displacement maps that I would ultimately use as stencils on the final helicopter model in Mudbox.
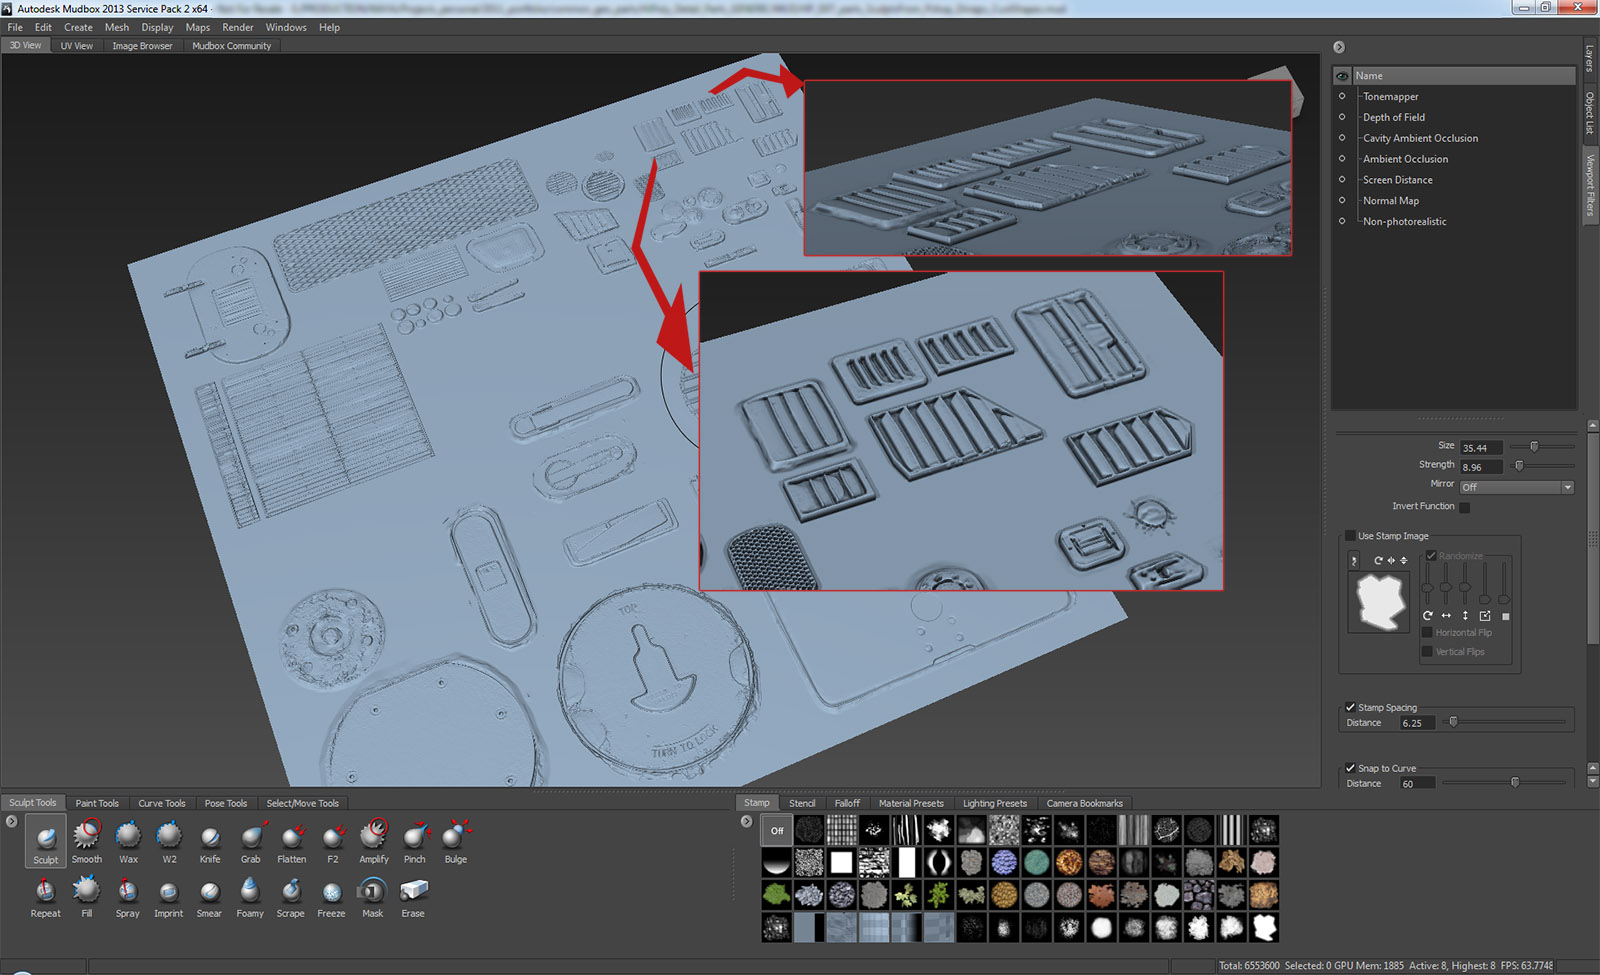
Here's an example of meshes that I initially built in Maya before bringing them into Mudbox and baking out a vector displacement map. For some of the smaller parts like bolts, I saved them out as VDM stamps rather than a stencil. This made it easy to quickly paint with different paths/angles/etc.
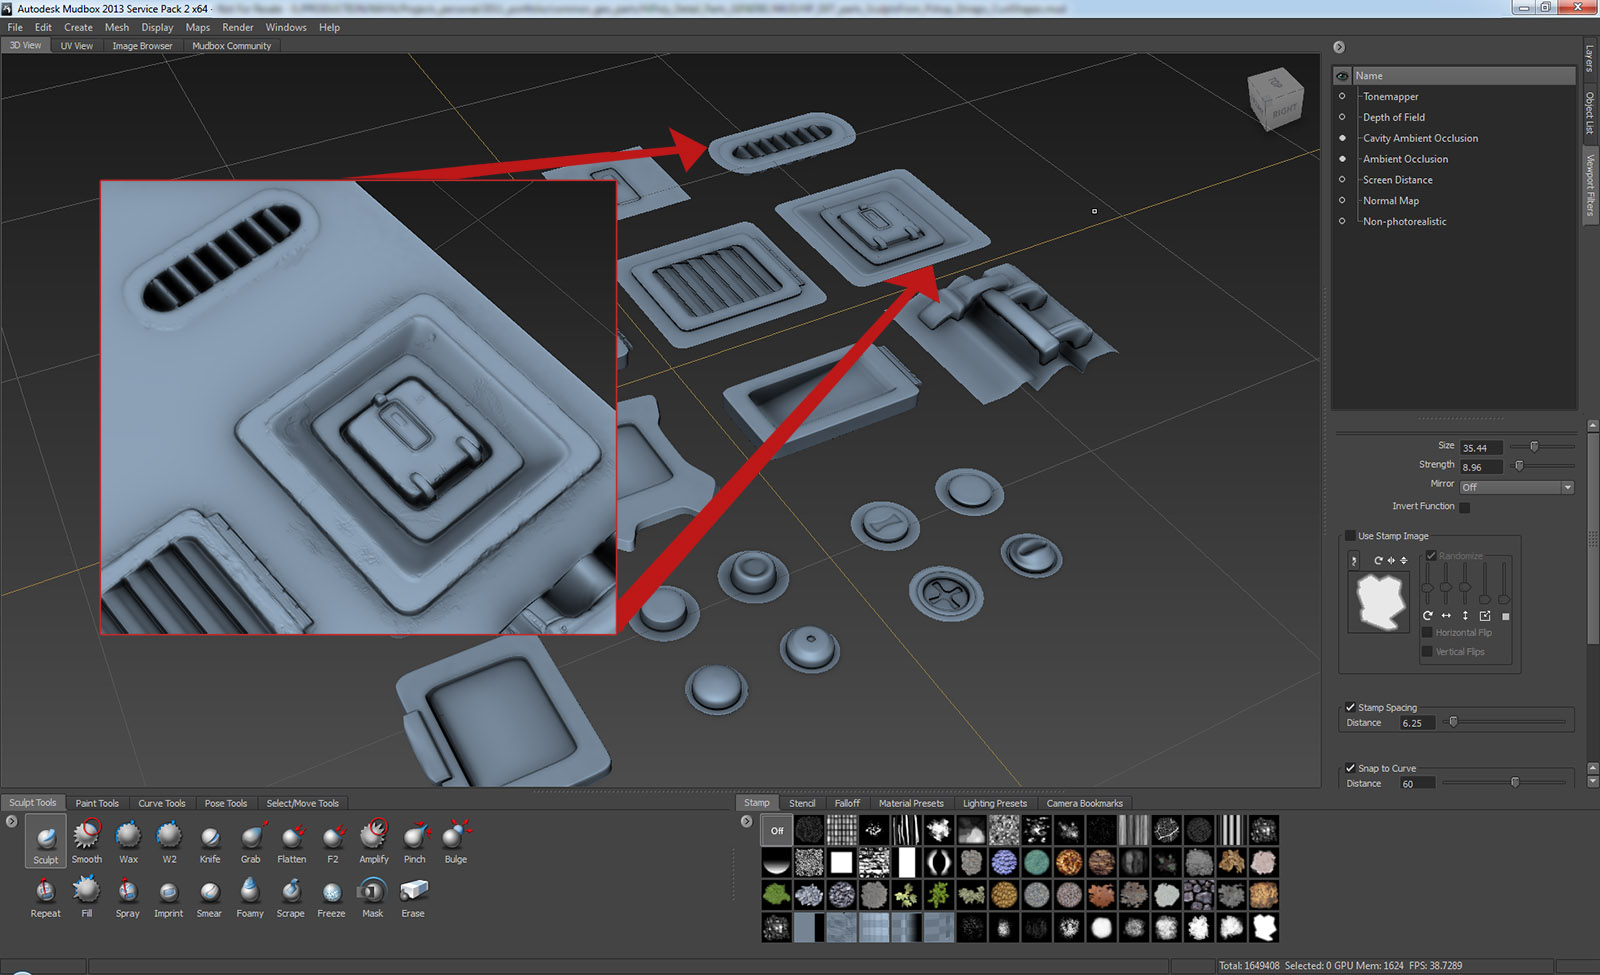
As an alternative to using lots of VDM stamps, I also created additional detail planes of bolts that I then used as VDM stencils for rapid projection sculpting. Some situations benefited from the slight randomness of these stencils vs the randomness allowed from stamps. There are tons of ways to approach this so use what works best for your personal worfklow and comfort level.
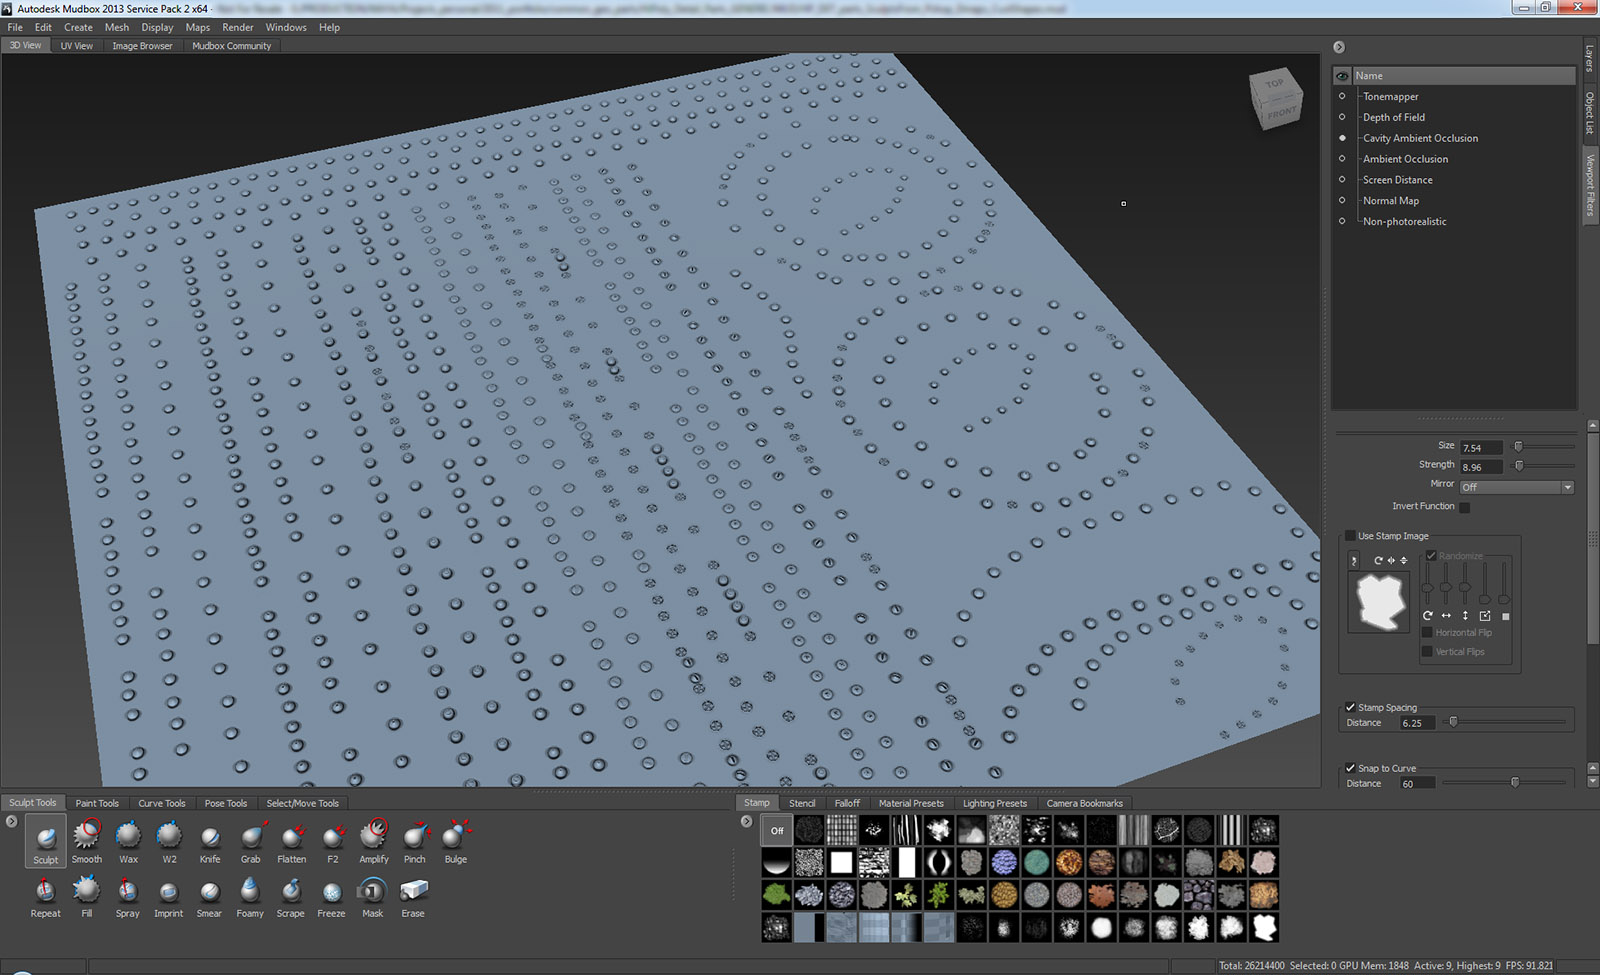
Here's an example of how I re-used sections from these detail planes on various portions of the helicopter in order to quickly generate the detail I needed. These were used in the form of VDM stamps and VDM stencils (VDM = vector displacement maps).
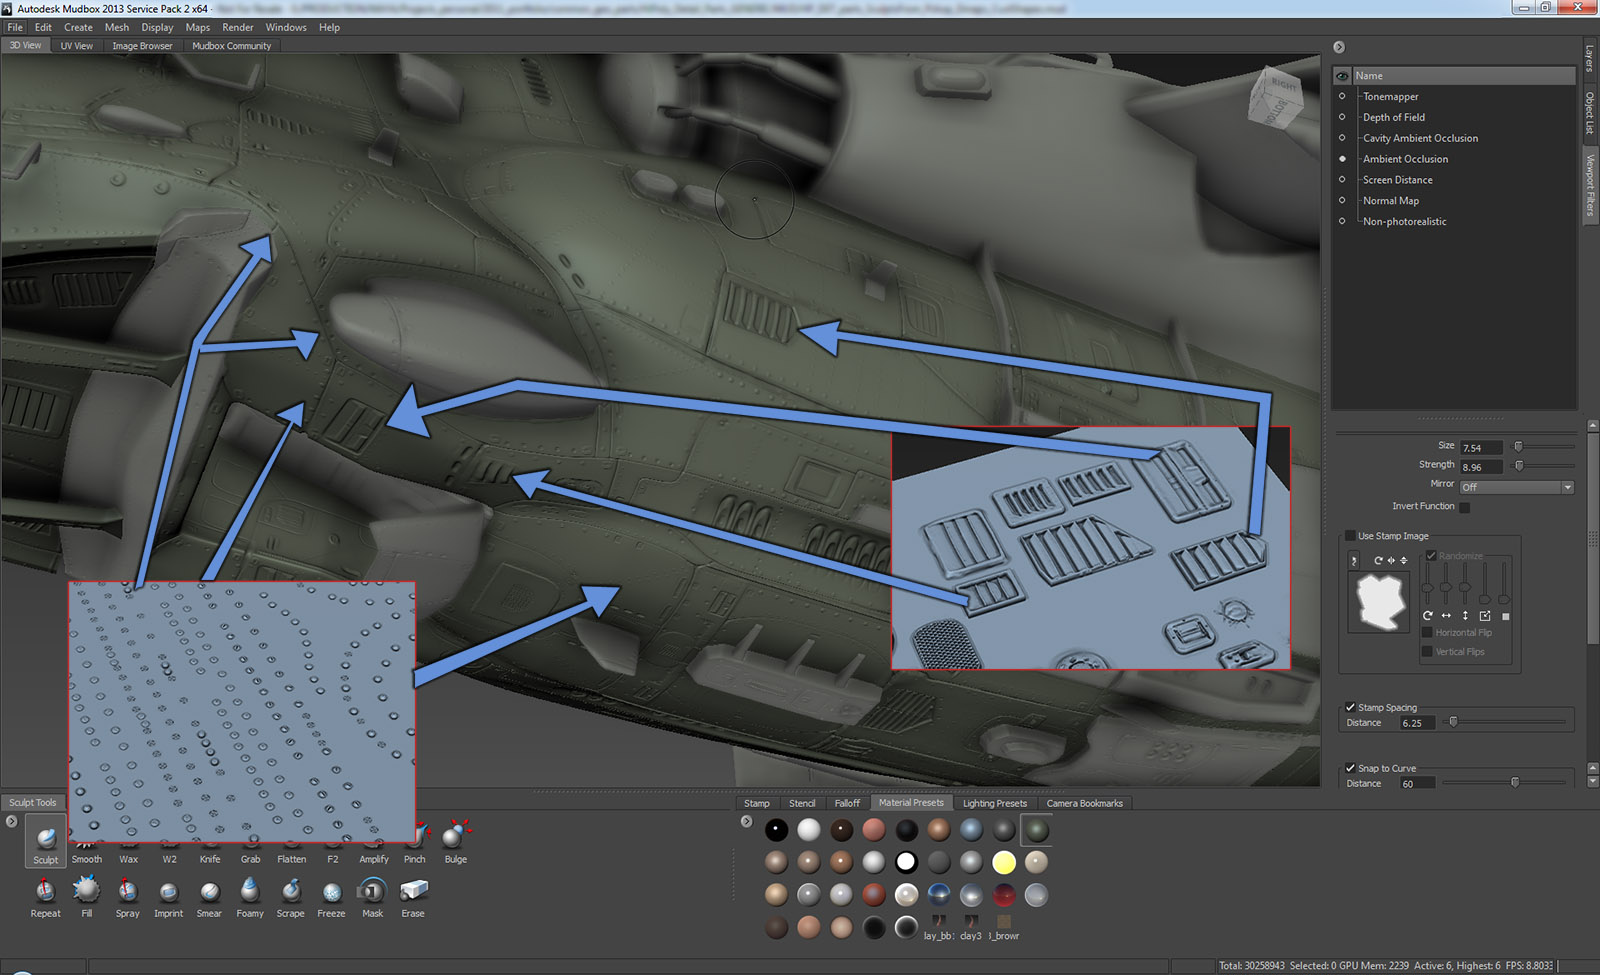
Here's one example of how the base mesh looked initially before I used the VDM stamps and stencils and sculpted other details.
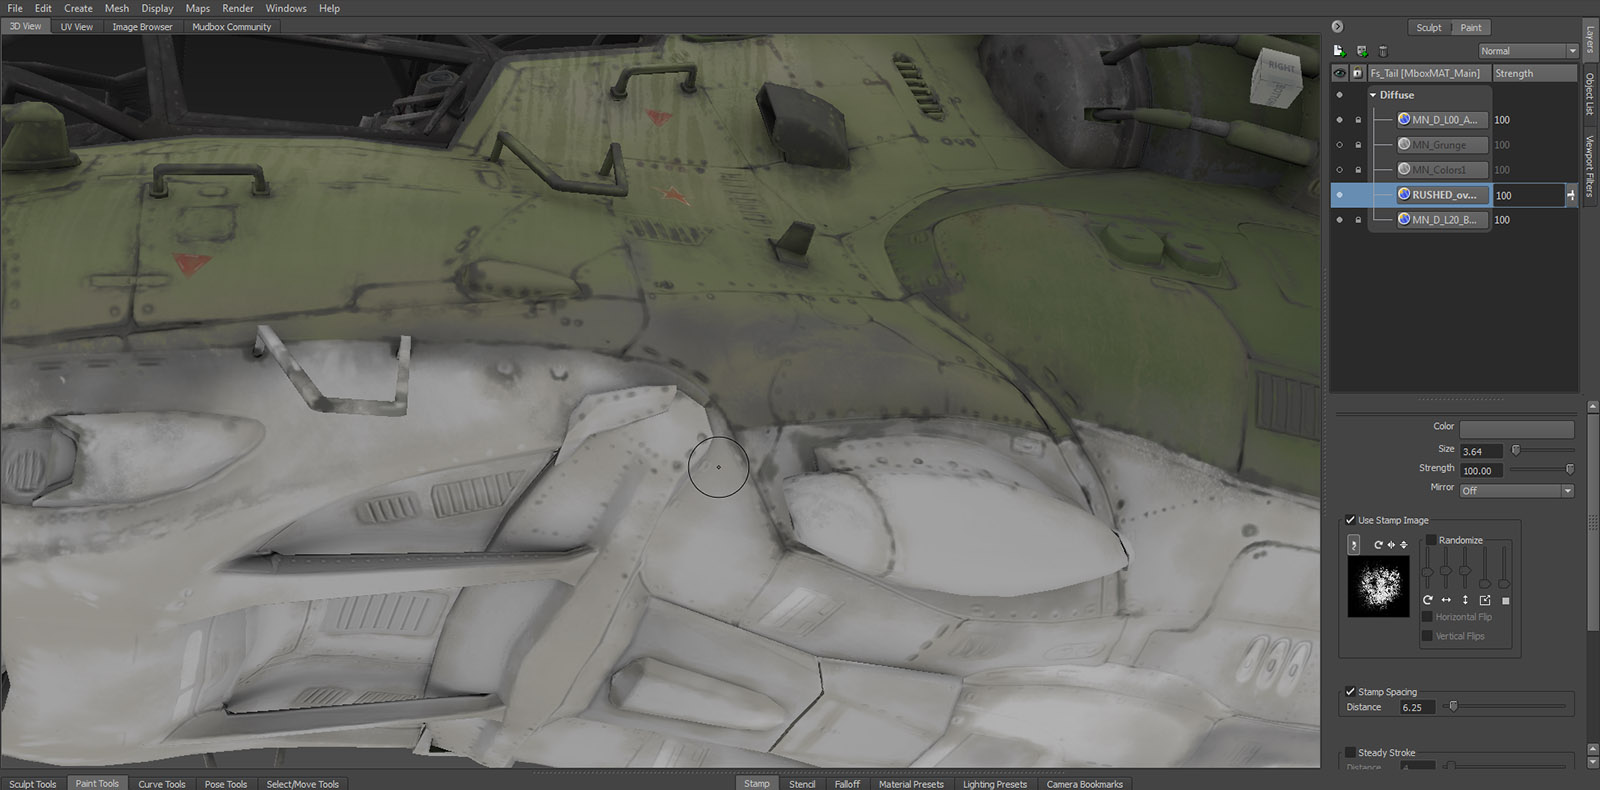
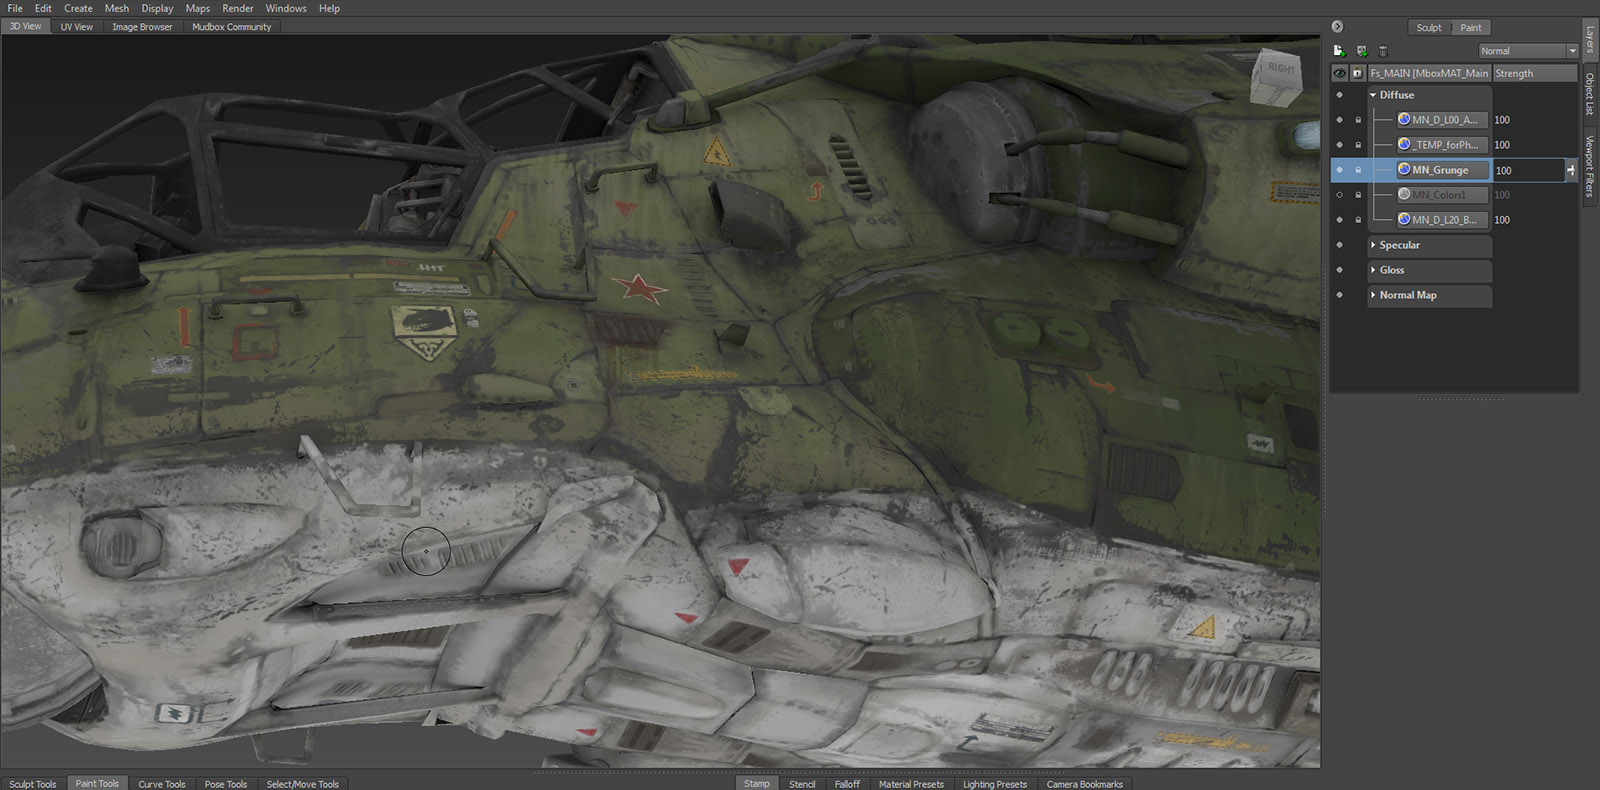
Texturing in 3d - - - Using stencils and custom paint brushes in Mudbox:
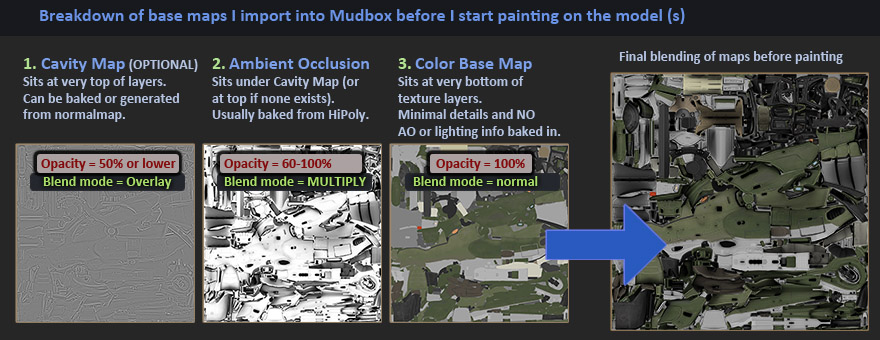
Before I attempt to paint textures on my helicopter in Mudbox, I follow a few steps to make the process go as smoothly as possible.
1) I save out a flat base color map (no AO) that only has simple color swatches with fairly minimal details. I also save out an AO map so that I can add that as a top multiply layer in Mudbox and see detail easily while working in flat lighting mode (feel fee to add a cavity map if you need to see more details for painting reference, especially if you're staying in unlit mode without a normalmap).
2) I make a specific variant of the model just for Mudbox painting. This means no UVs outside the 0-1 space and the geometry is split up into pieces that make sense for painting and masking. I might also add 1 level of smoothing to the model without affecting the mesh shape or UV borders.
3) Once I'm in mudbox, I create all necessary materials (you can have multiple materials as long as your exported model had multiple materials assigned) and assign them to their respective meshes. Due to rendering issues with overlapped tangent normalmaps in Mudbox 2012/13 I do not bother assigning my normalmap. I also, exclusively paint in UNLIT mode (display option) and use 16-bit tiff files.
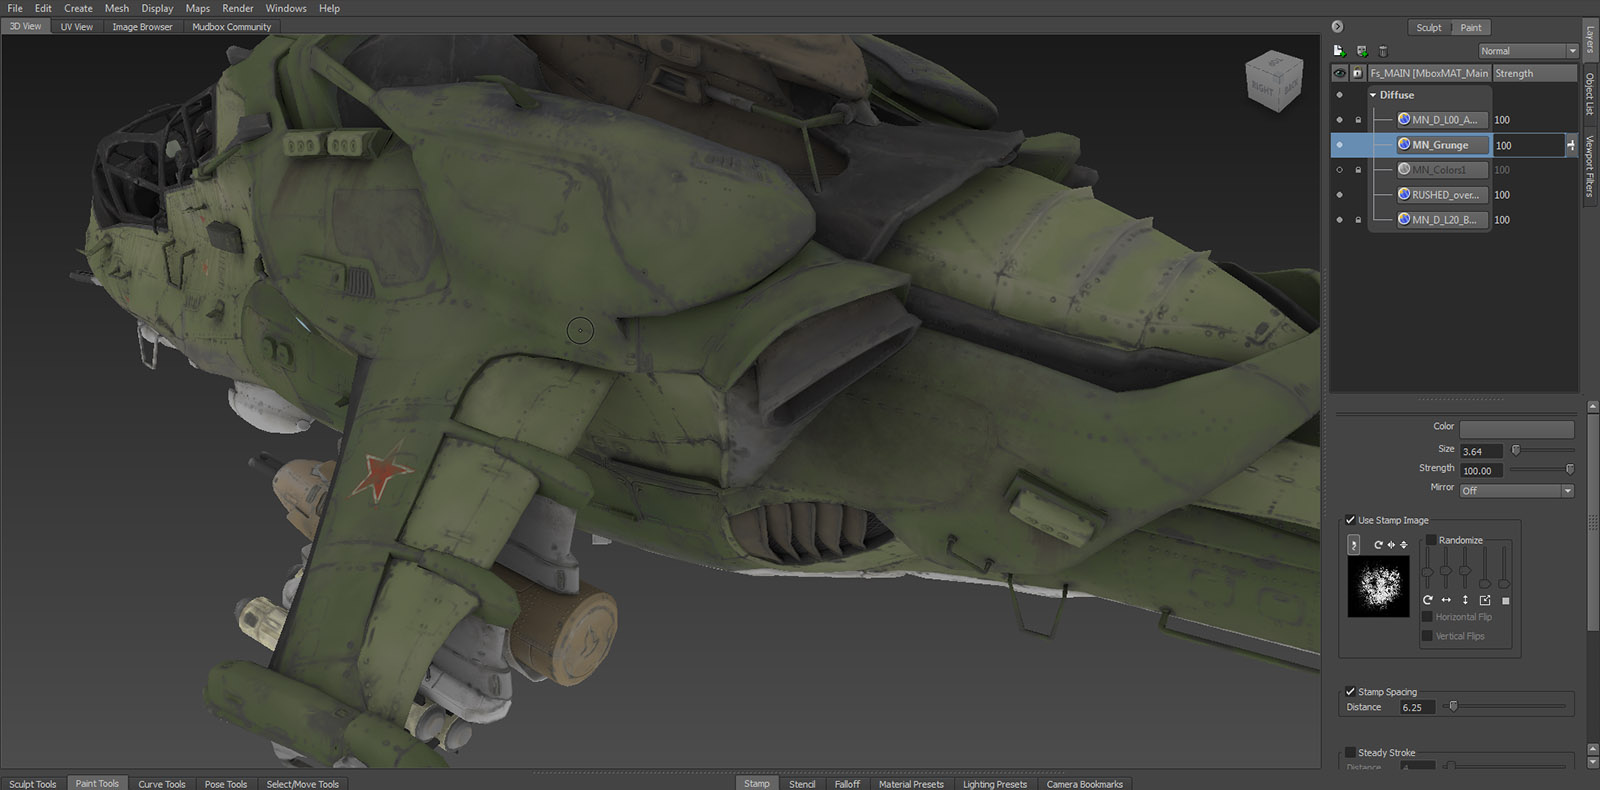
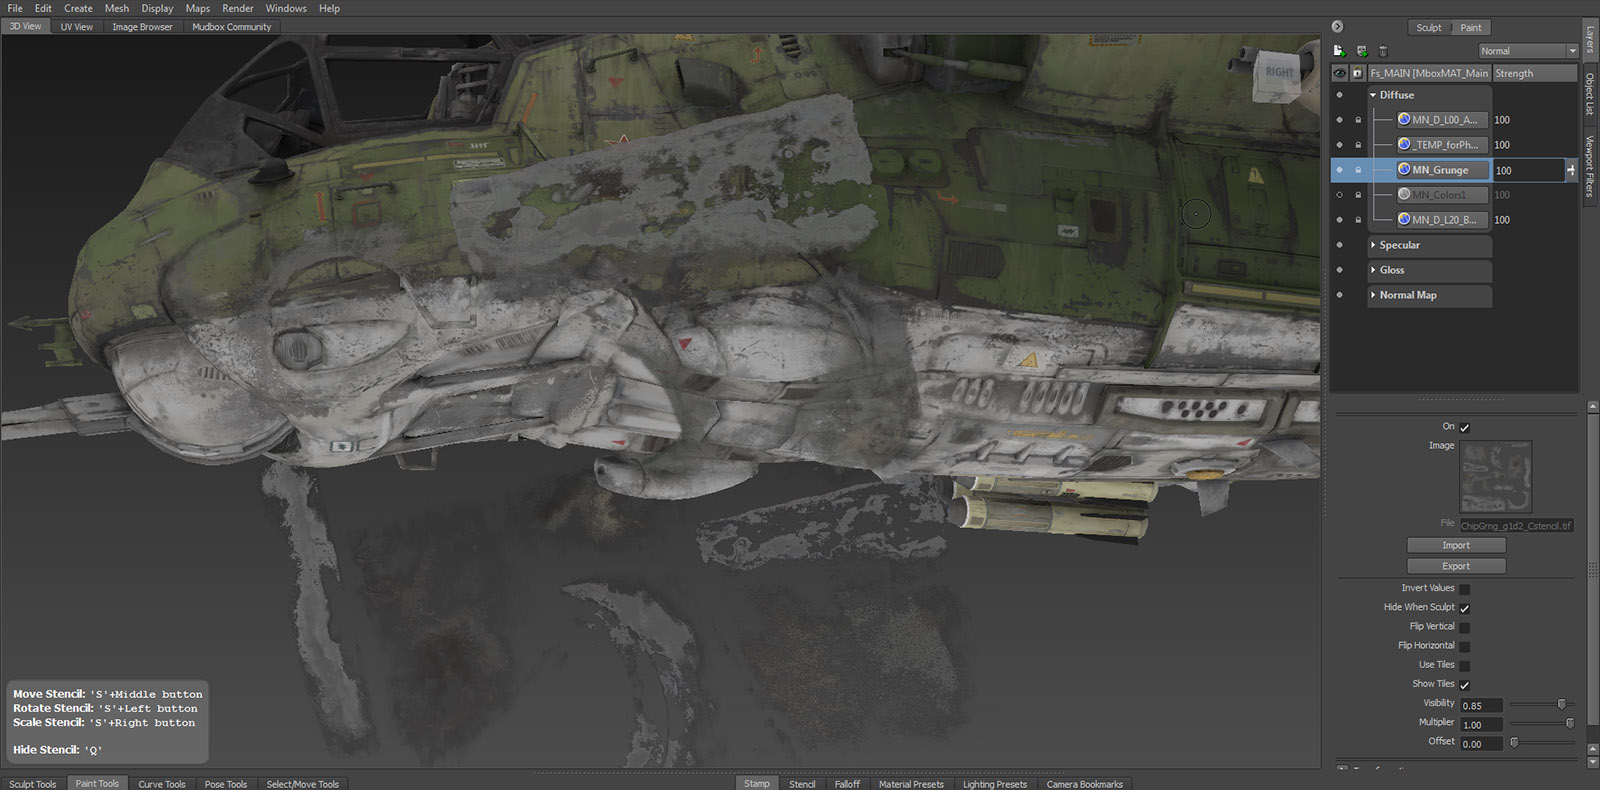
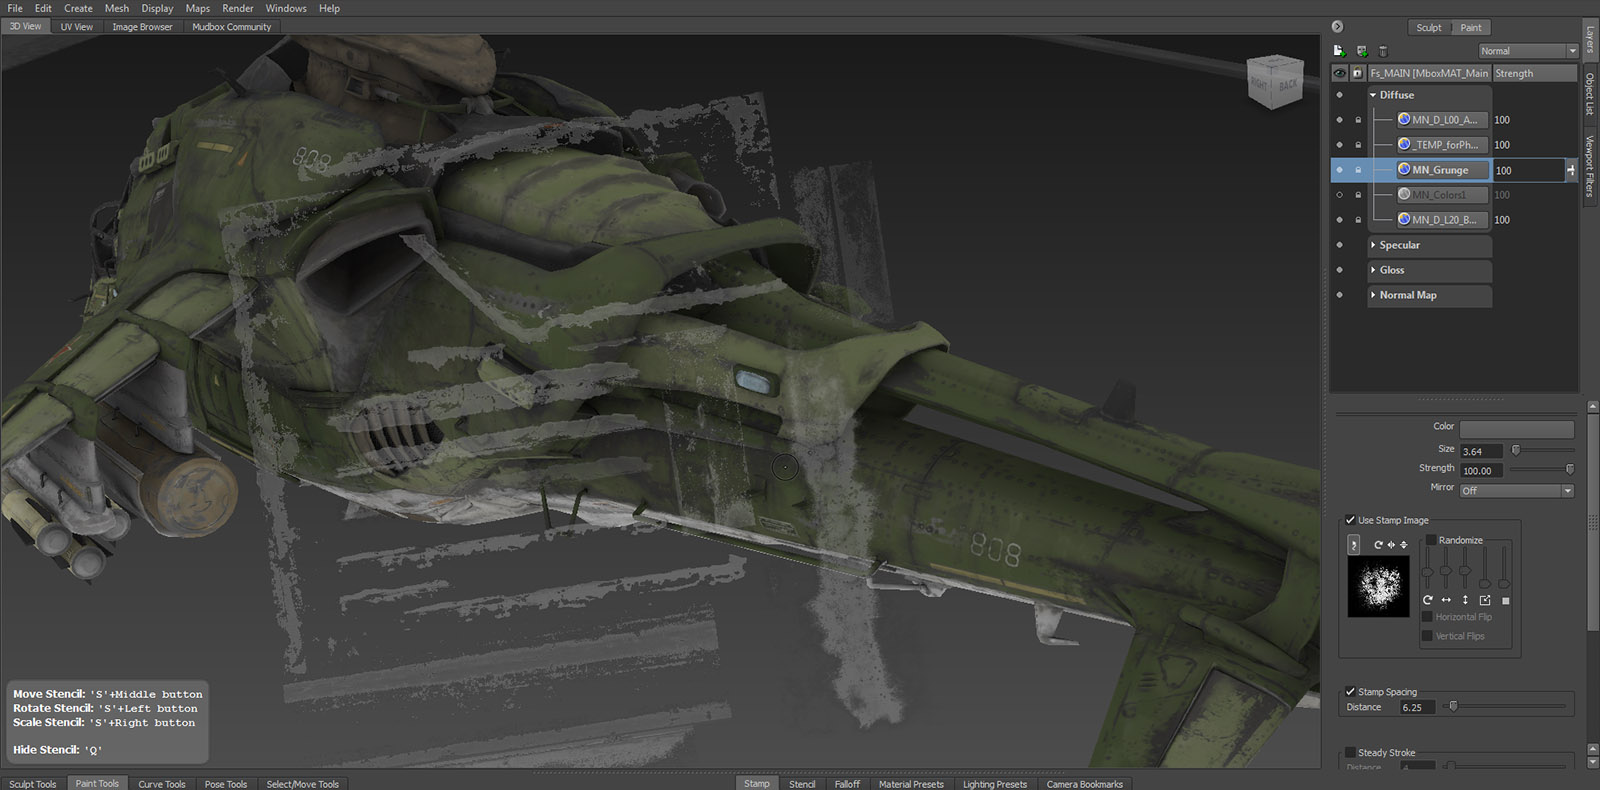
In the images below, I slowly build up the detail in Mudbox once I'm happy with the general color scheme and weathering/aging plan. I rely on several custom brushes that I've created previously, in addition to lots of stencils. When adding new layers, whether in mudbox or photoshop, try to arrange the order based on how you think the asset would function in the real world. For example, it's more likely that dry dirt would sit on top of large scratches vs the other way around. (unfortunately these image samples don't show my proper original layers due to old file recovery issues)
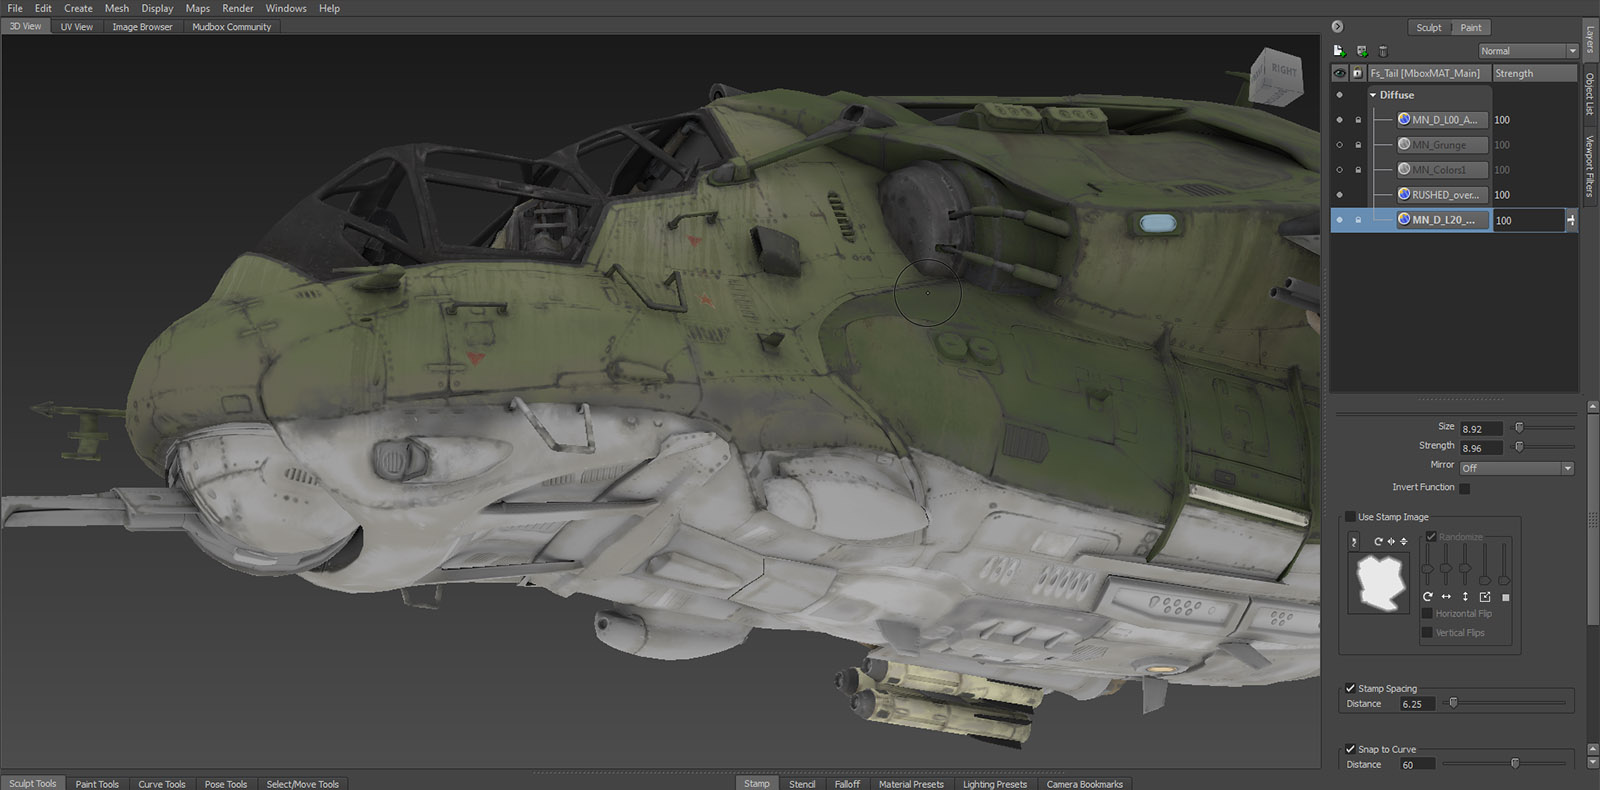
Adding more weathering using custom brushes and stencils (extra decals added in photoshop):
An early stage shot of the rear/top area:
Stencils:
I can't stress enough how helpful it is to build up a library of stencils that you can re-use across multiple assets. I spent a lot of time generating these stencil sheets based off of my own photos and a few samples from cgtextures.com. You can use the stencils as they are and retain all of their value and color info via the projection brush or you can just use them as masks and paint in specific colors or values at your leisure with the standard paint brush.
All that's required is just switching between your projection brush, regular brush or even your eraser in mudbox. Combine these with custom brushes for even more potential.
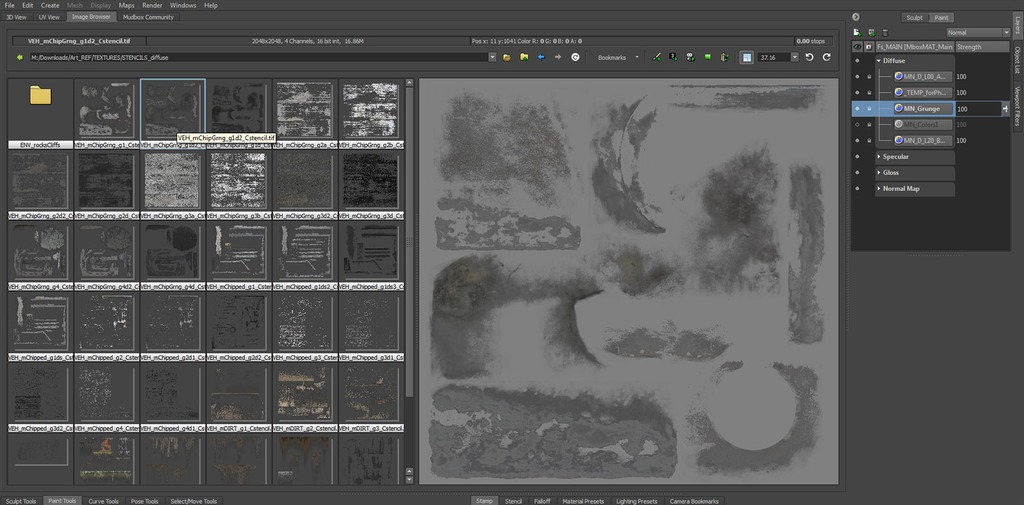
Here are a few more samples where the texturing is further along as I apply more stencil painting:
Final Textures:
I'm very careful with how I layer my diffuse maps in both Mudbox and Photoshop because the final stages of texturing involve utilizing these maps to generate specular (color spec) and gloss (cosine) maps. These maps are much more critical for physical based lighting engines but even if using something more basic, try not to just quickly convert your maps to greyscale and adjust the contrast through sliders in photoshop.
Always question what real world material you're going for and how your weathering and aging process would affect the spec intensity and radius of the highlight (gloss/cos). For this helicopter I exaggerated some areas and used color in the color spec where it wouldn't exist in the real world in order to make up for not using a sky based cube map in some of my renders. For painted metal if I wanted to be more realistic I would remove most of that color.
Art Direction and general aesthetic goals:
Even though I've been working on these sorts of assets for 10+ years in the VG industry, I still struggle to find the proper balance between detail, authenticity, and eye rest areas. As challenging as it may be, it's something we all as artists should strive for when dealing with realistic vehicles and weapons. Just like traditional painters would do, always check your models/textures at various distances to make sure shapes, colors, and values are reading properly.
This may prove to be harder or easier depending on what type of asset you're working on but as long as you're constantly mindful of it, you will be much better off in the long run. From artists at game studios like Valve to model kit painters and artists in the film industry, there are luckily LOTS of awesome examples to be inspired by.
Mudbox bonus tips (for 2012-2013 - not tested on newer versions):
1) Mudbox can be very picky about the meshes you paint on. Not only do you need to avoid non-manifold geometry but you need to keep your UVs safely within the 0-1 range and allow some sort of edge padding, otherwise you might end up with duplicate textures generated per layer that you create.
2) Brush Sample Area and Edge Bleed can be tweaked to avoid artifacts depending on what you're doing (find these in your paint prefs). Reduce the bleed and sample area if you're painting along mirrored UV seams. Regardless of your seams, if you happen to have a fairly low poly object with large triangles or quads, your brush sample area needs to be higher to avoid stair stepping artifacts (try 2-3). If you go too high, performance will suffer so be cautious.
3) I've run into issues exporting individual 16 bit targas into photoshop from Mudbox (usually gamma correction related) but experienced zero issues exporting the entire multi-layered PSD over. Stick with the PSD method if you have any concerns about this.
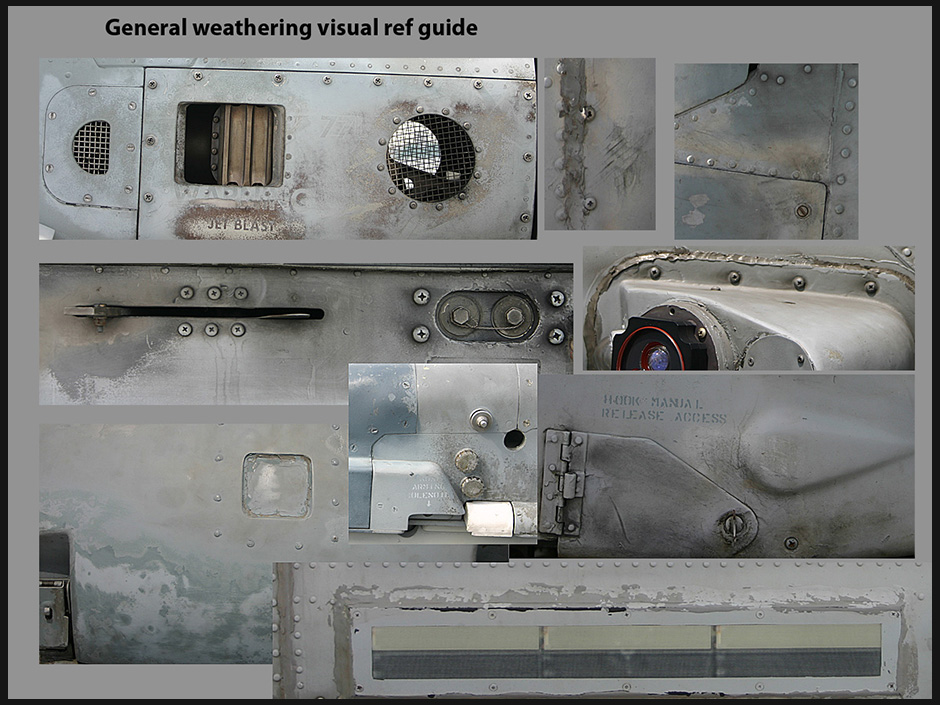
Texture reference:
For texture reference I took most of my own photos before getting too deep into the project. It's probably not necessary that you go to that extreme, especially with so many useful online libraries available these days. Here's a sample of the sort of weathering I found fairly common among several helicopters that had seen combat (and one lone harrier) during my photo shoots:
Reducing polycount for Unity using Maya LT:
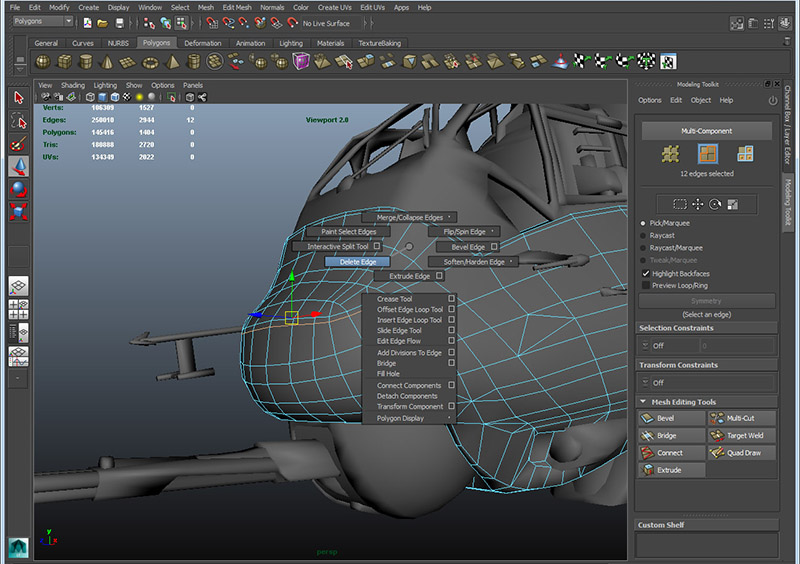
In order to make the helicopter mesh more efficient for mobile devices running Unity, I used Maya LT to reduce the polycount from 35,000 triangles to under 25k. Here are some simple techniques I used during this process.
1) One of the fastest ways to reduce the poly count for a rounded or smoothed shell is to double click the loop or ring, Shift + Right mouse button and choose "Delete Edge". - see image below -
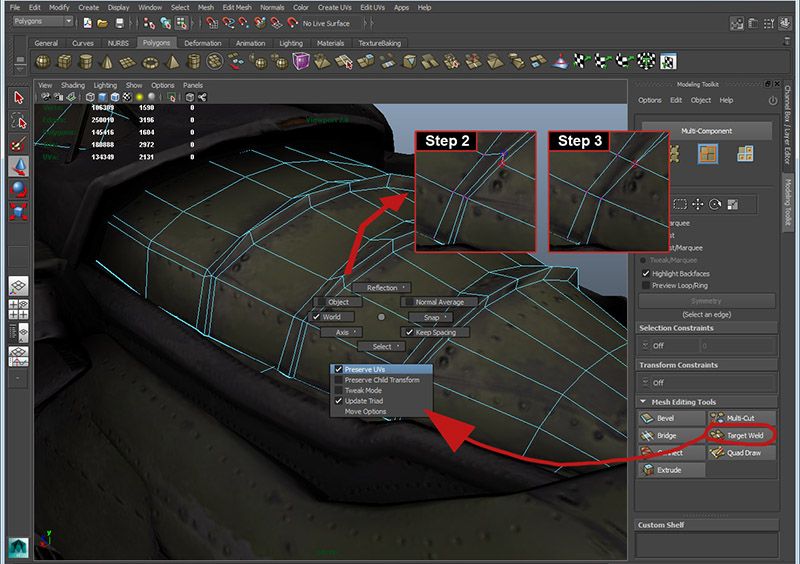
2) Target Weld from the modeling toolkit can be quite useful for removing unnecessary vertex detail. Be sure to enable "Preserve UVs" if you're editing an asset that already has a proper UV unwrap (hold "w" + Left mouse button to bring up the menu to preserve UVs). - see image below -
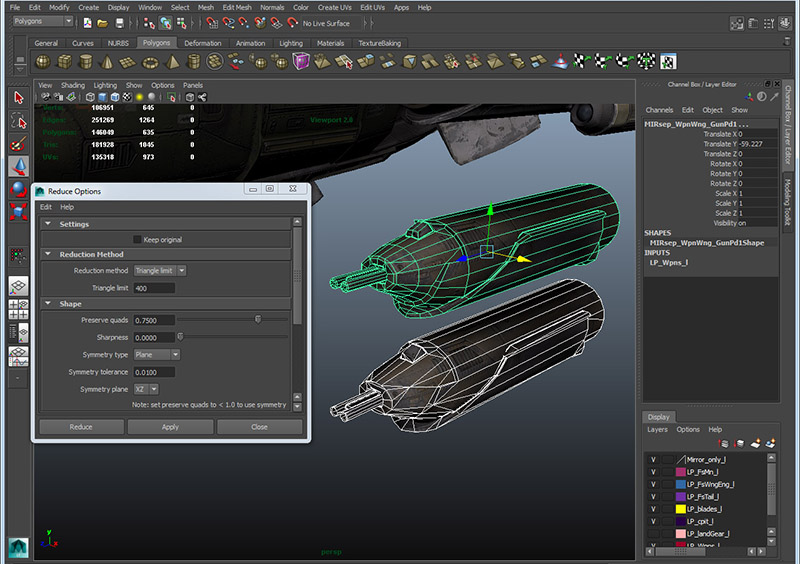
3) The Poly Reduce functionality can be quite powerful, especially if manual reduction methods are taking too long to perform. Adjusting the target count along with Preserve Quads and Sharpness can give drastically different results so it's recommended to duplicate your mesh and try these various settings for visual comparison. Highlight your mesh, Shift + Right mouse button to select the Reduce options box. - see image below -
Baking from hiPoly to lowPoly:
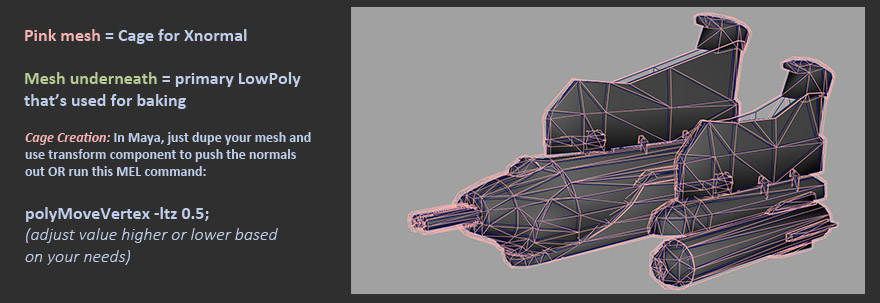
Xnormal was used for the majority of my normalmap and ambient occlusion map baking due to the quality plus speed combo. I made a strong effort to always save out and bake with custom cages. As a backup, I also baked without a cage and composited isolated sections of the non-cage bakes for certain trouble spots. I would use scripts in maya to "inflate" the cages a specific amount based on the mesh and label the file with the percentage used for reference later on (in case I needed to increase or decrease cage). I tried to avoid ever tweaking the cages on a component level due to the time wasted if re-bakes were needed. I also started using a new technique where I animated my master Maya bake scene so that it contained the proper combined heli and the exploded version.
Since this helicopter was originally baked back in 2011, when I had a chance to re-bake it after reducing the polycount in Maya LT, I used the force hard edges per UV border edge technique for higher quality normalmaps (especially when compressed for game engine). I've been using that technique for almost all of my hard surface work since then.